Replacing your HomeHub 3000 with a new HomeHub 3000 (Internet service)
- Copper service
- Disconnect the cables in sections 1, 2 and 3 on your current HomeHub 3000.
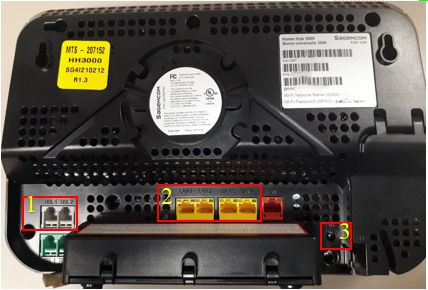
Images may not be exactly as shown. -
Connect the cables into sections 1 and 3 on your new HomeHub 3000.
- DSL 2 port (section 2) isn’t used in this configuration.
- Ethernet cables can be connected to any LAN port (section 3).

Images may not be exactly as shown.
- Connect the power adapter included in the box to the power port (section 2) on your HomeHub 3000.
Note:
The red port (section 1) is not used in this configuration.

Images may not be exactly as shown. -
Ensure that you write down the new wireless credentials which are located on the back of the HomeHub 3000 (section 1). The Wi-Fi Network Name (SSID) refers to the new Wireless Network name that you will be connecting to and the Wi-Fi Password (WPA2) is the new wireless password that you will be using.
- The Wi-Fi network name and password can also be seen by pressing the “Key” on the front of the HomeHub 3000.
- If you are using Bell MTS Whole Home Wi-Fi Pods continue to connect to the same Wireless Network name as you did prior.
- If you need help with creating a custom Wi-Fi network click here
- Click on the links if you need help connecting your computer or mobile device to the Wi-Fi.

Images may not be exactly as shown.
- Disconnect the cables in sections 1, 2 and 3 on your current HomeHub 3000.
- Copper service - Pair bonded
- Disconnect the cable from DSL 1 and DSL 2 (section 1) on the old HomeHub 3000 and plug them into the corresponding ports on your new HomeHub 3000.
- Ensure not to mix the cable ends going to DSL 1 (pair one white/blue) with DSL 2 (pair two white/orange).

Images may not be exactly as shown.
- Ensure not to mix the cable ends going to DSL 1 (pair one white/blue) with DSL 2 (pair two white/orange).
- Disconnect the cables in sections 1 and 2 on your current HomeHub 3000.

Images may not be exactly as shown. - Connect the cables into section 1 on your new HomeHub 3000.
- Ethernet cables can be connected to any LAN Port (section 2).

Images may not be exactly as shown.
- Ethernet cables can be connected to any LAN Port (section 2).
- Connect the power adapter included in the box to the power port (section 2) on your HomeHub 3000.
Note:
The red port (section 1) is not used in this configuration.
Images may not be exactly as shown. -
Ensure that you write down the new wireless credentials which are located on the back of the HomeHub 3000 (section 1). The Wi-Fi Network Name (SSID) refers to the new Wireless Network name that you will be connecting to and the Wi-Fi Password (WPA2) is the new wireless password that you will be using.
- The Wi-Fi network name and password can also be seen by pressing the “Key” on the front of the HomeHub 3000.
- If you are using Bell MTS Whole Home Wi-Fi Pods continue to connect to the same Wireless Network name as you did prior.
- If you need help with creating a custom Wi-Fi network click here
- Click on the links if you need help connecting your computer or mobile device to the Wi-Fi.
Images may not be exactly as shown.
- Disconnect the cable from DSL 1 and DSL 2 (section 1) on the old HomeHub 3000 and plug them into the corresponding ports on your new HomeHub 3000.
- Fibre service
- Disconnect the cables in sections 1, 2 and 3 on your current HomeHub 3000.
- Avoid mixing up the Ethernet cables in section 1 and 2.

Images may not be exactly as shown.
- Avoid mixing up the Ethernet cables in section 1 and 2.
- Connect the cables into sections 1 and 2 on your new HomeHub 3000.
- Ethernet cables can be connected to any LAN port (section 1).

Images may not be exactly as shown.
- Ethernet cables can be connected to any LAN port (section 1).
- Connect the power adapter included in the box to the power port (section 2) on your HomeHub 3000.
Note:
The grey DSL ports (section 1) are not used in this configuration.

Images may not be exactly as shown. -
Ensure that you write down the new wireless credentials which are located on the back of the HomeHub 3000 (section 1). The Wi-Fi Network Name (SSID) refers to the new Wireless Network name that you will be connecting to and the Wi-Fi Password (WPA2) is the new wireless password that you will be using.
- The Wi-Fi network name and password can also be seen by pressing the “Key” on the front of the HomeHub 3000.
- If you are using Bell MTS Whole Home Wi-Fi Pods continue to connect to the same Wireless Network name as you did prior.
- If you need help with creating a custom Wi-Fi network click here
- Click on the links if you need help connecting your computer or mobile device to the Wi-Fi.
Images may not be exactly as shown.
- Disconnect the cables in sections 1, 2 and 3 on your current HomeHub 3000.